
Switching from a MacBook Air 3,1 to a MacBook Air 7,1 was necessary. I was sure it would include some hardware problems to deal with because I don’t use Mac OS X, I use Linux. But not only minor problems laid ahead. The hard disk of the MacBook Air 7,1 was not recognized by the installation CDROMs of OpenSuSE Leap 41.1 and Ubuntu 15.10. What’s the matter? This text describes my journey to a booting operating system on my new toy. It shall be a guide for people to follow before there is installable distribution that even work on the MacBook Air 7,1 and further Apple notebook with an Apple NVMe controller.
The problem about installing Linux on the up-to-date versions of the MacBook Air and probably some other notebooks from Apple, like the Macbook version 8, is the build in hard disk controller. The Macbook Air 7,1 is still delivered with a solid state disk (SSD). It comes with an NVMe controller but a new one from Apple Inc. itself. The mass storage device registers at the operationg system as one. And that is the problem: it does not register as a NVMe device.
Nowadays Linux kernel comes with an NVMe module but they don’t recognize the Apple one. Fixes are out there and the problem shall be solved by kernel 4.4.0. I tried a 4.3 version and could see the SSD. I wasted a lot of time with a kernel 4.4.0 release candidate 2 (rc2). Despite seeing the devices, partitioning did not work. The kernel module crashed – at worst. The hard disk maintenance program of Mac OS X was able to deal with it. In the end I found out that kernel 4.4.0 rc4 works.

MacBook Air 7,1 with Linux
Step 1: Install a working Ubuntu 15.10 Wily on a USB stick
The easiest way to install Ubuntu without a running installation CDROM or live CD is probably form another Linux system onto a hard disk. I installed Ubunty Wily (15.10) from a USB stick onto a USB stick. Therefore I used the MacBook Air but that does not matter.
Boot into this system.
Step 2: Install Linux Kernel 4.4.0rc4 on that Ubuntu USB Stick
I installed the fresh kernel. Have a look at Linuxdaddy for a how-to.It is still a little bit buggy, I can tell from some messages in the log files. Reboot.
Now you should be able to see the SSD. I had deleted all parititions but one by the help of Mac OS x. You should not need that and use CLI parted.
For further steps you’ll need a LAN connection. WLAN will be installed later. You need the ethernet connectioner on the MacBook Air 7,1.
Step 3: Partitioning the NVMe SSD
Use ‚fdisk‘ or ‚parted‘ to partition your solid state disk. I kept the first partition with the EFI boot system from Apple. I added a 4+ GB swap partition. It has to be as big or bigger than the memory of the MacBook Air 7,1 which has 4 GB memory. The space is need for suspending / hibernation to work. Shutting the MacBook Air shall later suspend the notebook or even turn it into hibernation. Hence the content of the non permanent memory, the 4 GB ram, shall be written to the 4 GB SWAP paritition. Opening the MacBook Air shall restart the operating sytem. Either it was just suspend, but if in hibernation it needs to restart from the solid state this. The Linux kernel shall have a look if there is a running system in hibernation. If so the SWAP space shall be loaded into memory. Hibernation is over. What a dream, if it works.
Here are my partitions from testing:
 1 24.6kB 315MB 315MB fat32 EFI System Partition boot, esp
 2 316MB 4800MB 4485MB linux-swap(v1) swap
 3 4800MB 5002MB 201MB boot boot, esp
 4 5002MB 25.0GB 20.0GB btrfs LinuxOS
 5 25.0GB 55.0GB 30.0GB btrfs LinuxData
For EFI boot I install a FAT partition which shall be mounted as /boot/efi
There is the root directory / for Ubuntu on parititon 4. Partition 5 shall be /home.
Use parted to make partition 3 bootable.
If necessary create file systems in the partitions.
Step 4: Mount Partitions
Create a directory /mnt/ubuntu on your running system on the USB stick. Mount partition 4 at /mnt/ubuntu. This will be the root directory of the new installation. Create /mnt/ubuntu/home and mount partition 5 there. Create /boot and /boot/efi. Mount partition 3 at /boot/efi
Check via 'swapon' if swap space is recognized.
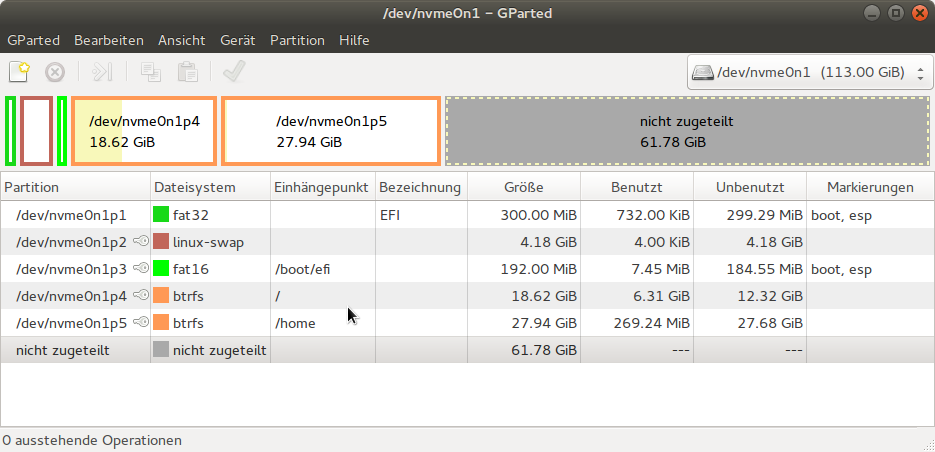
Partitions for installing Ubuntu 15.10 Wily on NVMe SSD
Step 5: Install Ubuntu 15.10 via debootstrap
Have a look at a tutorial for installing 6 Ubuntu via ‚debootstrap‘, e. g. here at help.ubuntu.com. The steps are downloading the package of debootstrap and unpacking it. Some devices from /dev need to be bound (via mount) to /mnt/ubuntu/dev You’ll need to use ‚chroot‘ to tell apt-get that /mnt/ubuntu shall be treated as root directory.
Install ubuntu-desktop or ubuntu-gnome-desktop:
sudo apt-get install ubuntu-desktop
Installation means downloading, unpacking and setting up. This will take a while.
Step 6: Install Linux Kernel 4.4.0rc4
You need the files from before or download them again. The new system will probably be Ubuntu 15.10 with kernel 4.2 Update the new system to kernel 4.4.0rc4 (or later) like you did for the USB stick. The systems don’t differ but booting form hard disk won’t work.
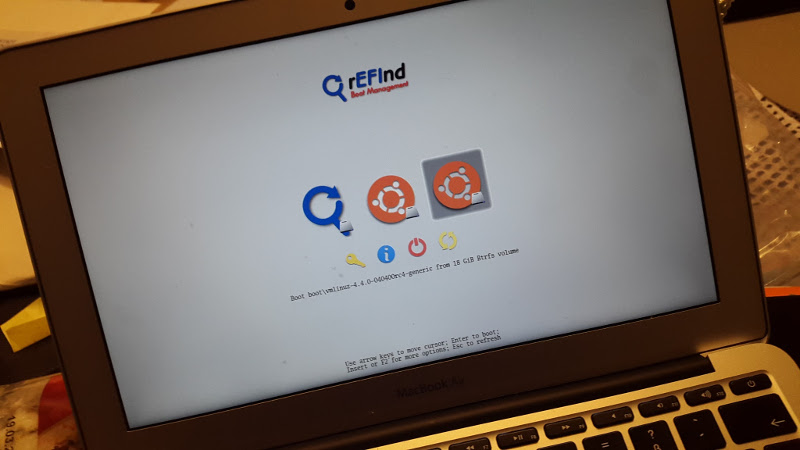
Step 7: Install rEFInd Boot Manager
Read the manual for manual installation of rEFInd. You may use grub2 alternatively. I just copied the necessary files from my USB stick to partition 3. There are different ways. Add the file reconf_linux.conf to /boot where the linux kernel is. This file takes parameters for the kernel to boot.
Here is my content of reconf_linux.conf
"Boot with normal options" "ro root=UUID=53079581-35a7-4275-ace7-6660efcdbd0d initrd=boot\initrd.img-4.4.0-040400rc4-generic resume=\dev\nvme0n1p2 acpi_backlight=vendor quiet splash"
The option acpi_backlight=vendor is necessary for changing the backlight of the screen later. Without that option the keys F1 and F2 only show a symbol of changing the brightness but nothing happens.
The resume option indicates where the data is for suspending / hibernation. Maybe a UUID is correct here. I did not test this so far.
Find the UUID for the root directory on partition 4 (via parted or ls /dev/disk/by-uuid). It has to be add for the option root. initrd tells the kernel is on root.
Carfully! The system still cannot boot! You would end in the busybox shell and see an error message.

rEFInd Boot Manager auf MacBook Air 7,1
Step 8: Add NVMe Module to Boot Kernel
rEFind is able to see the NVMe SSD hard disk. The kernel will be load and the RAM filesystem form initrd.img. But the freshly booted kernel of the starting system won’t be able to see the SSD partitions controlled by NVMe. The kernel of the starting is still lacking the NVMe module. Therefore it cannot load the system of Ubuntu 15.10 with kernel 4.4rc4. Edit the files /etc/initramfs-tools/modules and add nvme at the last line. This tells the system to include the kernel module for NVMe into the filesystem loaded into RAM at startup. Call „sudo update-initramfs -u“ The file initrd.img should be ready now.
Don’t forget the file /etc/fstab on the new installed system. You will find all necessary entries on the system running from the USB stick. Just copy that fstab file and modify it, e. g. delete the partitions on the usb stick and change mount points.
This is my fstab:
UUID=3755eef8-7408-42cc-b20c-ffc888d29f85 swap swap default 0 0
UUID=0475-A4C5 /boot/efi vfat defaults 0 1
UUID=53079581-35a7-4275-ace7-6660efcdbd0d / btrfs defaults 0 1
UUID=a31141ab-ed69-4078-8da8-c76525e75297 /home btrfs defaults 0 1
Step 9: Boot the MacBook Air 7,1
Shut down the computer, remove USB stick and reboot. You might want to adjust language options now. That is not so easy for shell, desktop surface and keyboard. Especially Apple keyboard need an extra portion of adjustment. You will probably have to do some research for temporary and permanent solutions.
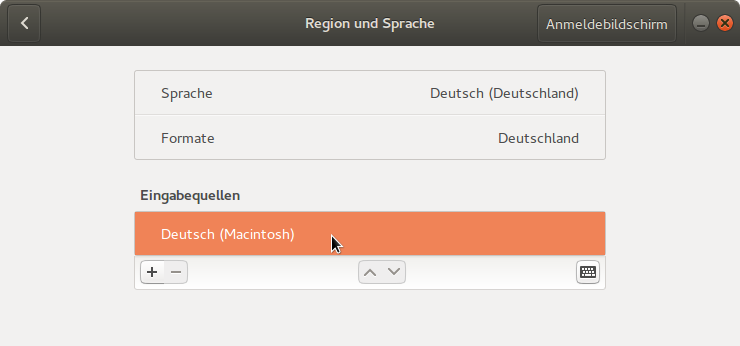
Adjusting layout of Macintosh Keyboard, look for appropriate language
Step 10: Adjusting for Notebook System – WLAN & Co.
I had to install the firmware-b43-installer. I could already use Ubuntu’s Software Center. After installation the Broadcom BCM4360 controler just worked. The built-in webcam above the screen of the MacBook Air is no longer an Apple iSight item. It is a Broadcom device as well, called FaceTime. Like the NVMe controller it is directly connected to the PCI bus. It is faster but for Linux there is no driver at the moment. bcwc_pcie is a project developing one. Just wait.
I configured 'powertop' and 'tlp' to deal with the battery. For hints have a look at this article about MacBook Air 6,2.
Conclusion
It takes a lot of time to install Linux on a MacBook Air, especially a new one like version 7,1 (2015) with new hardware. Development takes time. I am sure that solution will arrive within the next two to three months. I like the Ubuntu 15.10 running on my new MacBook Air now. I like the fast SSD. I can wait until spring 2016 for a new installation that hopefully will be easier.
Why spring 2016? On April 21st, 2016 Ubuntu 16.04 Xenial Xeru shall be ready. Due to the project’s roadmap it shall contain Kernel 4.4.0 in its final version. Maybe some boot option will allow to load the NVMe modul into the booting kernel or installation software, e. g. ubiquity.
Onto this day I will probably have to reinstall the kernel 4.4.0 with a less buggier release candidate or the final version. The workaround might be buggy but already is working stable on my machine.
Alternatives
Alternatively, someone could take the USB stick version or CDROM version of the installation package for Ubuntu 15.10 Wily and change the kernel, change the booting kernel to that with NVMe support, add the new kernel headers and the NVMe module to initrd.img. Repacked that could be a special installation CD for the MacBook Air 7,1. This might work for the MacBook Air 7.2 and the MacBook 8.1 as well. They ship with the same NVME controller.
This article derives from a longer report in German lanuage about my journey to a working Linux sytem on my MacBook Air 7,1.

Dirk Schmidt
14. Dezember 2015 at 22:28
http://yarenty.blogspot.de/2014/08/how-to-fix-macbook-pro-touchpad-on.html
install mtrack
Dirk Schmidt
15. Dezember 2015 at 08:11
First blog fixes black screen after suspend:
#/etc/pm/power.d/99macbookair6 true
brt=’cat /sys/devices/pci0000:00/0000:00:02.0/drm/card0/card0-eDP-1/intel_backlight/brightness‘
abrt=’cat /sys/devices/pci0000:00/0000:00:02.0/drm/card0/card0-eDP-1/intel_backlight/actual_brightness‘
logger -t rc.local „no brightness change needed, brightness is $afterbrt and actual is $abrt“
if [ „$brt“ != „$abrt“ ] ; then
echo $abrt > /sys/devices/pci0000:00/0000:00:02.0/drm/card0/card0-eDP-1/intel_backlight/brightness
afterbrt=’cat /sys/devices/pci0000:00/0000:00:02.0/drm/card0/card0-eDP-1/intel_backlight/brightness‘
logger -t rc.local „changed brightness to $afterbrt and actual brightness is $abrt“
else
afterbrt=’cat /sys/devices/pci0000:00/0000:00:02.0/drm/card0/card0-eDP-1/intel_backlight/brightness‘
logger -t rc.local „no brightness change needed, brightness is $afterbrt and actual is $abrt“
fi
/usr/sbin/xmodmap /home/smidtdct/.Xmodmap
/usr/sbin/powertop –auto-tune true
exit